How to Launch a Winback Campaign from Canceled Subscriptions in Stripe

Have canceled subscriptions in Stripe? Here’s how to win them back.
Customer reactivation via winback campaigns can be a substantial growth lever. Data shows as many as 30% of subscription customers who cancel may come back later, and effective winback marketing helps re-engage more of them, faster.
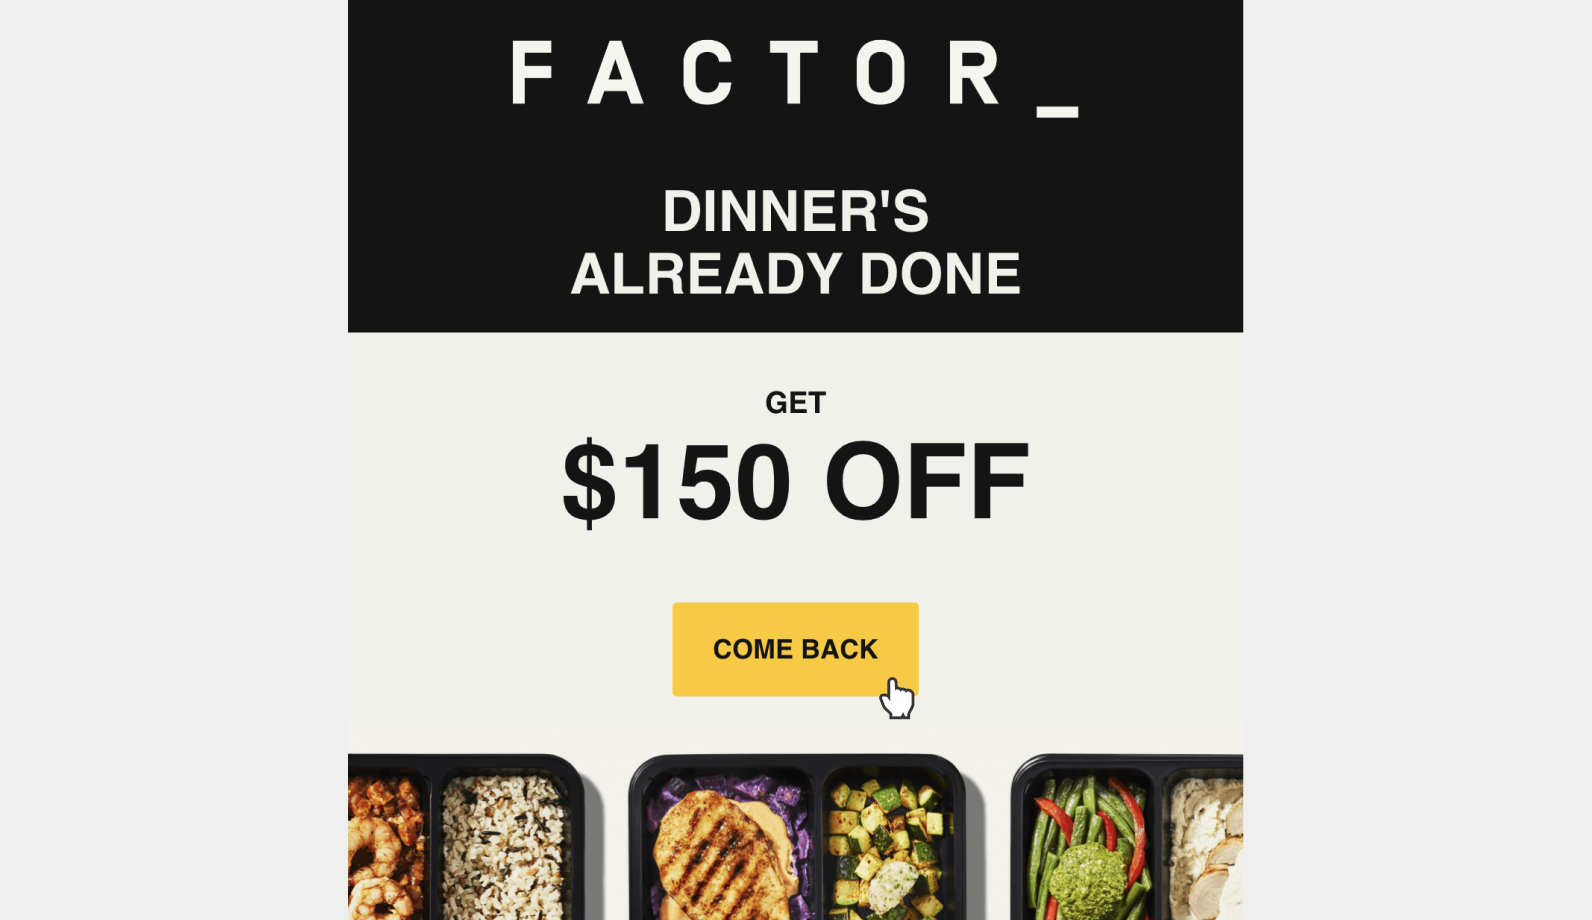
In this post for subscription-based businesses using Stripe, I walk you through the basics of setting up an email-based winback campaign to reactivate your canceled subscriptions. Let’s get started.
A winback campaign is targeted messaging that aims to re-engage churned or inactive customers, including those who have canceled a subscription, who didn’t convert during a free trial, or who haven’t purchased from your store in a while.
Winback campaigns are usually made up of 3-5 messages, most often via email, but omnichannel efforts including SMS/text, push notifications, social media and direct mail can prove highly effective. By engaging lost customers multiple times across different channels, you’re much more likely to catch them at the right time to take action.
Options for winning back lost Stripe customers
Although Stripe lacks built-in winback features, launching re-engagement campaigns from your cancellations can be done through various methods. Here are three options:
Export & import - The most basic option is to export your customer data from Stripe and import it into an email marketing platform (EMP) like Mailchimp.
One-way integration - Fully automate your winback campaign with an integration between Stripe and your marketing platform, either directly or through a third-party like Zapier.
ProsperStack Reactivate - Reactivate is the winback marketing automation platform for subscription-based businesses. Build highly targeted and personalized winback sequences, seamlessly integrated with Stripe. No developers required. See how it works.
Let’s consider each in more detail.

Export to CSV
There are powerful ways to automate customer winback campaigns from Stripe, but if you just want to get started quickly, an easy option is to export your subscription data from Stripe and then import it into an email marketing platform (EMP).
Here’s how it works:
Exporting subscriptions from Stripe
Follow these steps to export your canceled subscriptions from Stripe for use in your winback emails.
Log in to Stripe and go to the Subscriptions page.
Click the Canceled pill to filter the list to just canceled subscriptions.
Click the Export button on the right.
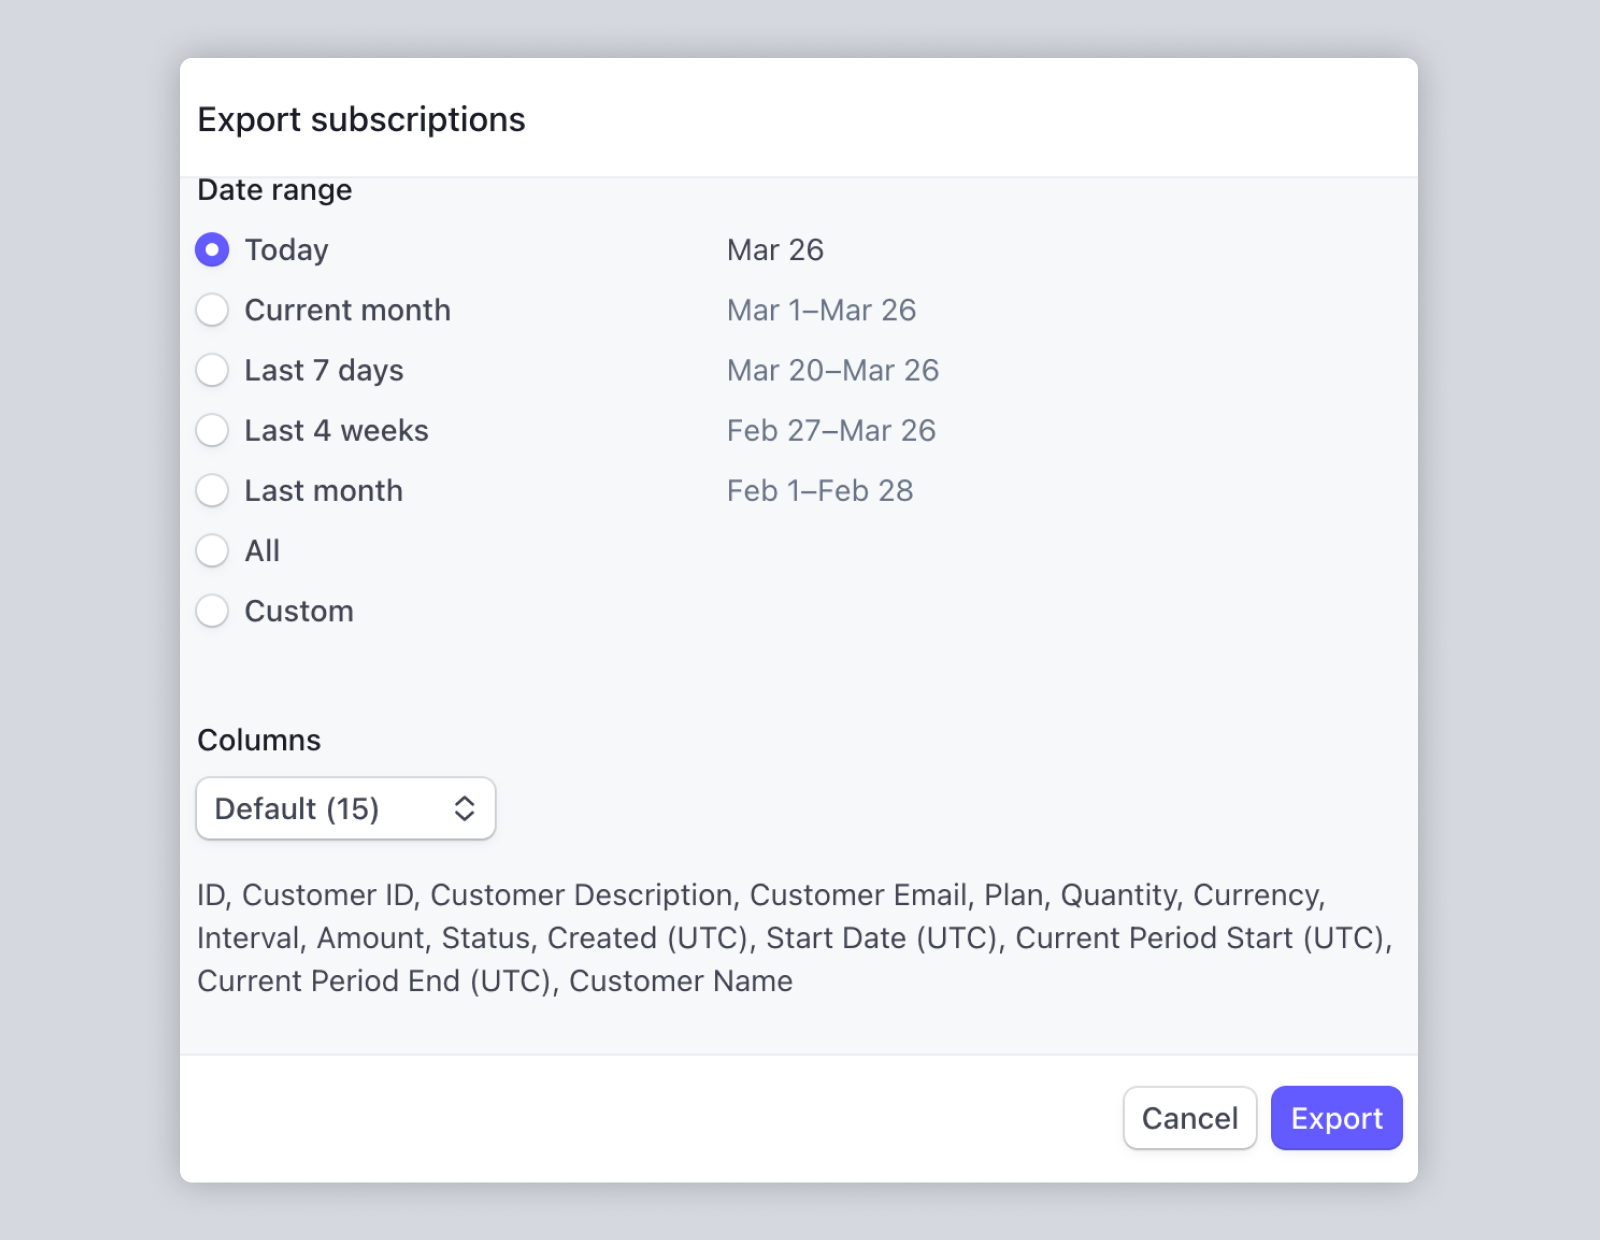
In the pop-up that opens, select your timezone preference, date range and columns.
Date range – The range applies to subscription status changes, including start and cancellation dates. Consider limiting your range to cancellations in the last six months.
Columns – Select columns to export. Make sure you include Customer Name, Customer Email and Canceled At. You may also want to include Plan, Product, Amount, Start Date and Cancelation Reason for customer segmentation.
Click Export to generate and download the CSV.
Importing into your email platform
Now that you’ve exported your data from Stripe it’s time to import it into an email platform like Mailchimp or Constant Contact. In this example we’re using Mailchimp.
After logging in to Mailchimp, expand the Audience section in the left navigation and click All contacts.
Click Add contacts on the right and choose Import contacts to open the import wizard.
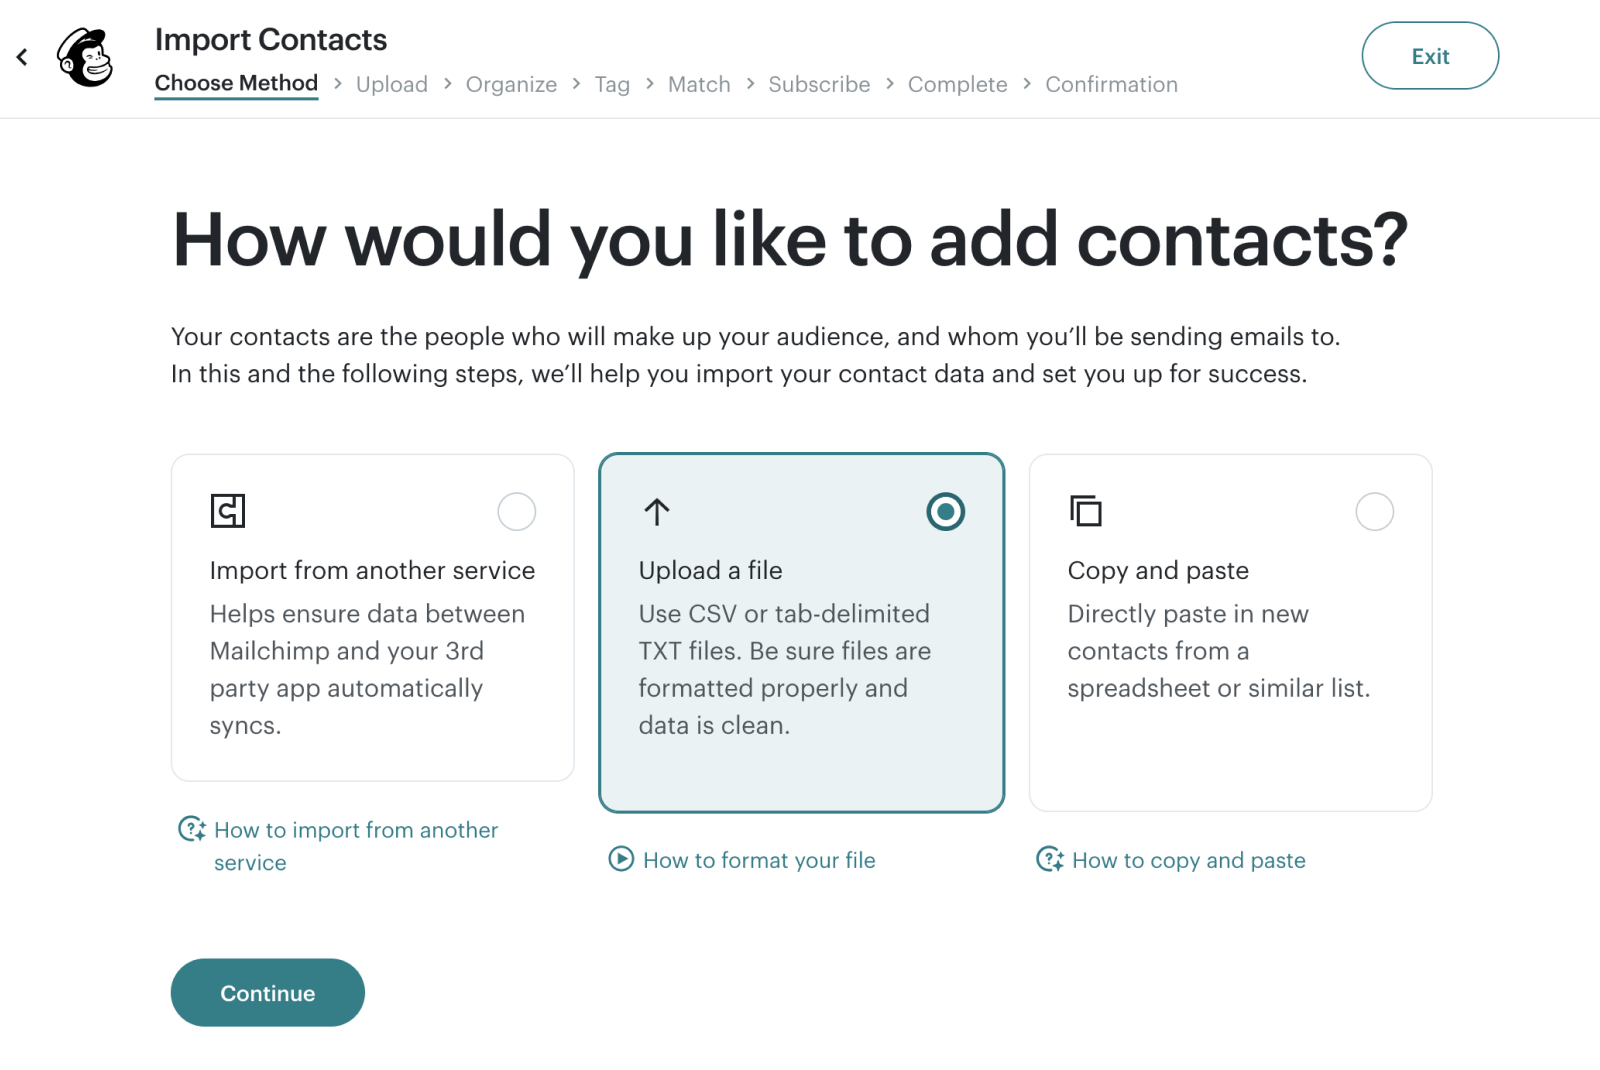
Select Import a file and click Continue.
Choose the CSV file you exported from Stripe and click Continue.
Select your audience and check Update any existing contacts.
Create a new tag called “Canceled” and click Continue.
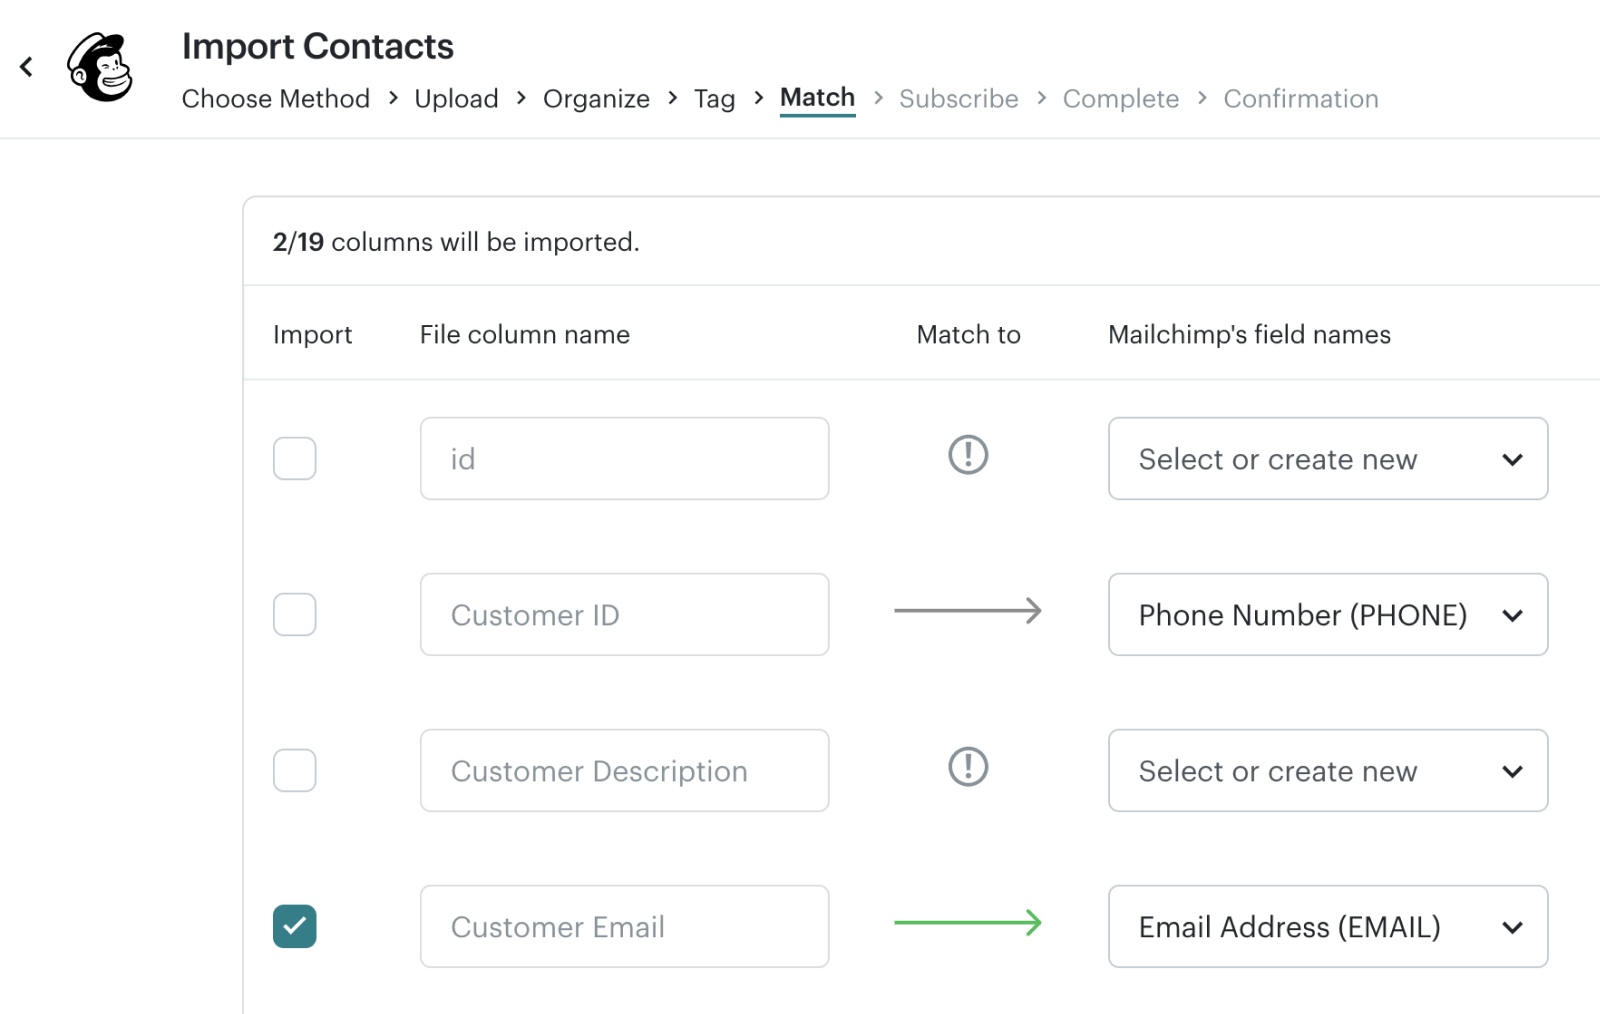
Here you’ll match fields from Stripe to Mailchimp. Ensure that name and email are matched:
Customer Email -> Email Address (EMAIL)
Customer Name -> First Name (FNAME)
For the Canceled At (UTC) field, click Create new field. Enter a title (e.g. Canceled At) and choose the Date type. Click Confirm.
Match other fields that you may want to use for customer segmentation, e.g. Cancellation Reason.
Click Continue.
Select subscriber status and click Finalize import.
Review import details and click Complete import.
Segmenting your audience
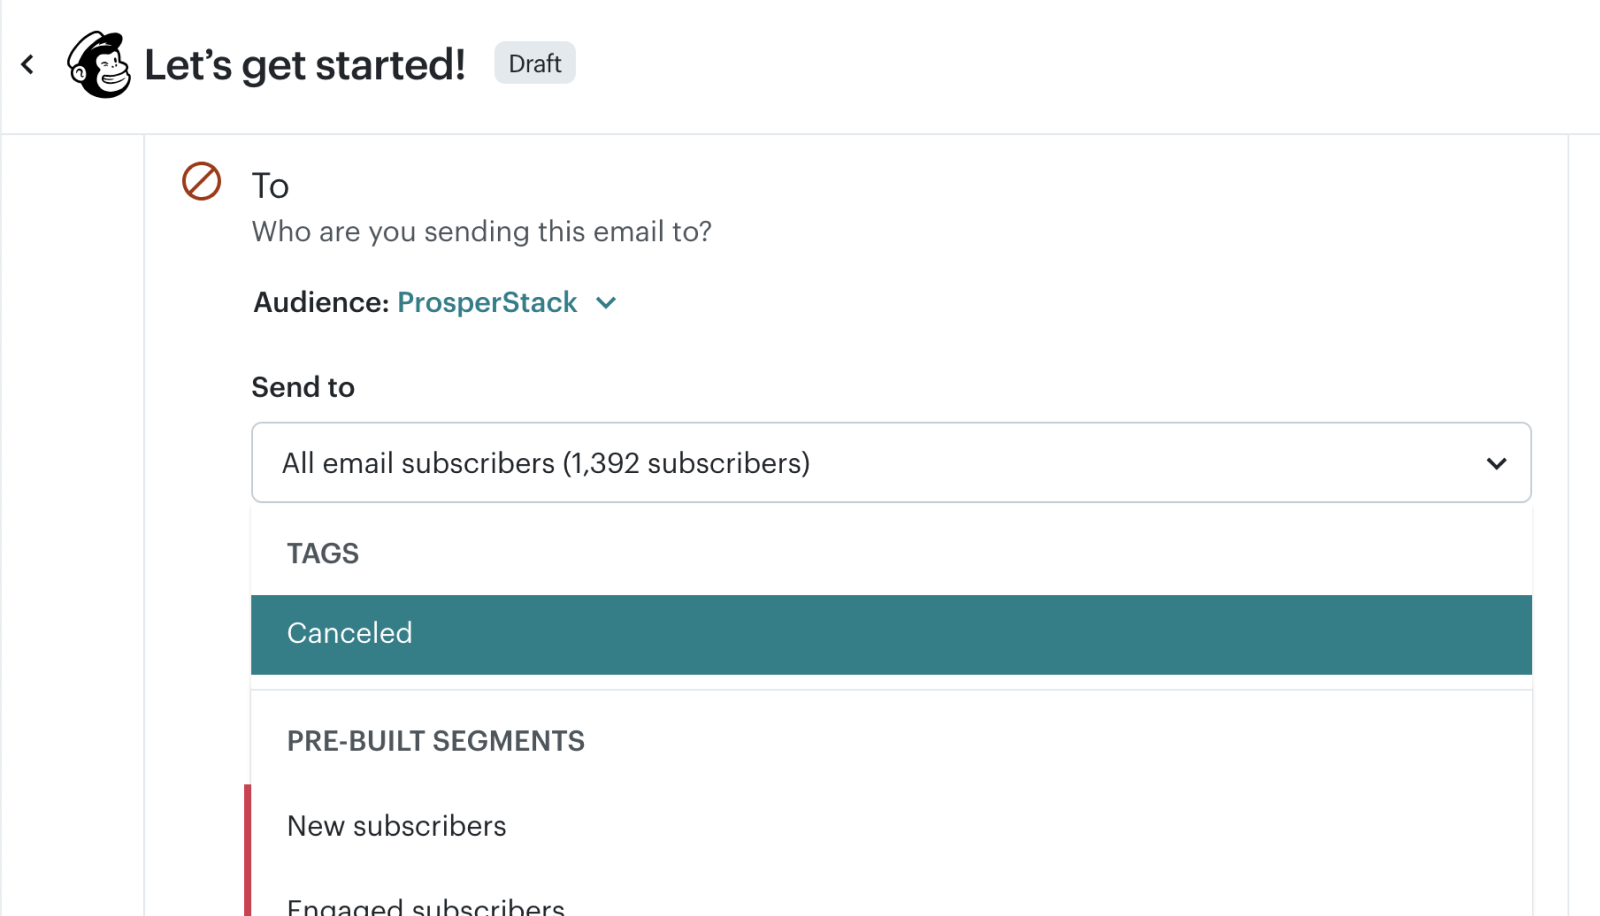
Before starting a winback campaign, you’ll need to segment your audience to canceled customers.
Additionally, consider grouping customers by LTV, reason for cancellation and likelihood to return. Personalization is key for successful winback campaigns, so be sure to tailor your campaigns to specific customer needs.
Learn more about creating segments in Mailchimp.
Creating an email campaign
The final step is creating an email campaign to send to your canceled customers. We won’t cover all the details of creating a campaign in Mailchimp, other than to remind you to limit your campaign to canceled subscribers, either by the Canceled tag created during import or your custom segments.
Limitations
While relatively easy to set up, the export/import method has some limitations:
It must be done manually each time you want to run a campaign
It’s more difficult to subdivide your lost customer base into segments
It’s not simple to include other data for personalization, such as exit survey responses, likelihood to return, customer support tickets, NPS and more
This method is great if you have a one-time promotion in mind, or just want to test the waters. But for ongoing winback marketing efforts, you’ll want to automate the process. That’s our next topic.
Because winback campaigns typically involve sending multiple personalized messages over a period of time, they are typically automated via a marketing platform like Klaviyo.
However, when you’re just getting started with re-engagement efforts, it’s often better to keep it simple. Sending messages manually allows you to test your ideas on a small subset of customers, then iterate and improve. When your campaign is dialed-in, it’s time to automate it.
Automate with Zapier
To fully automate your winback marketing you’ll need to connect your Stripe data with your marketing platform, either directly or via a third-party like Zapier.
In this example we’ll set up an automation to create/update contacts in HubSpot whenever a Stripe subscription is canceled and then add that contact to a workflow. We’ll use Zapier to connect the two platforms. (HubSpot does have a direct integration with Stripe, but it is for payment processing only.)
The steps described here are for HubSpot in particular but are generally applicable for integrating other marketing platforms.
Here’s an overview of the setup process:
Configure a Zapier automation to pass Stripe cancellations to HubSpot
Build a HubSpot workflow automation to send your winback sequence
Design a winback email template
Update the Zapier automation to enroll contacts in your HubSpot winback workflow
Configuration nightmares? Try ProsperStack Reactivate—it takes the guesswork out of winback automation and works seamlessly with Stripe.
Let’s get into the nitty gritty.
1. Set up a “Zap” to add Stripe cancellations to HubSpot
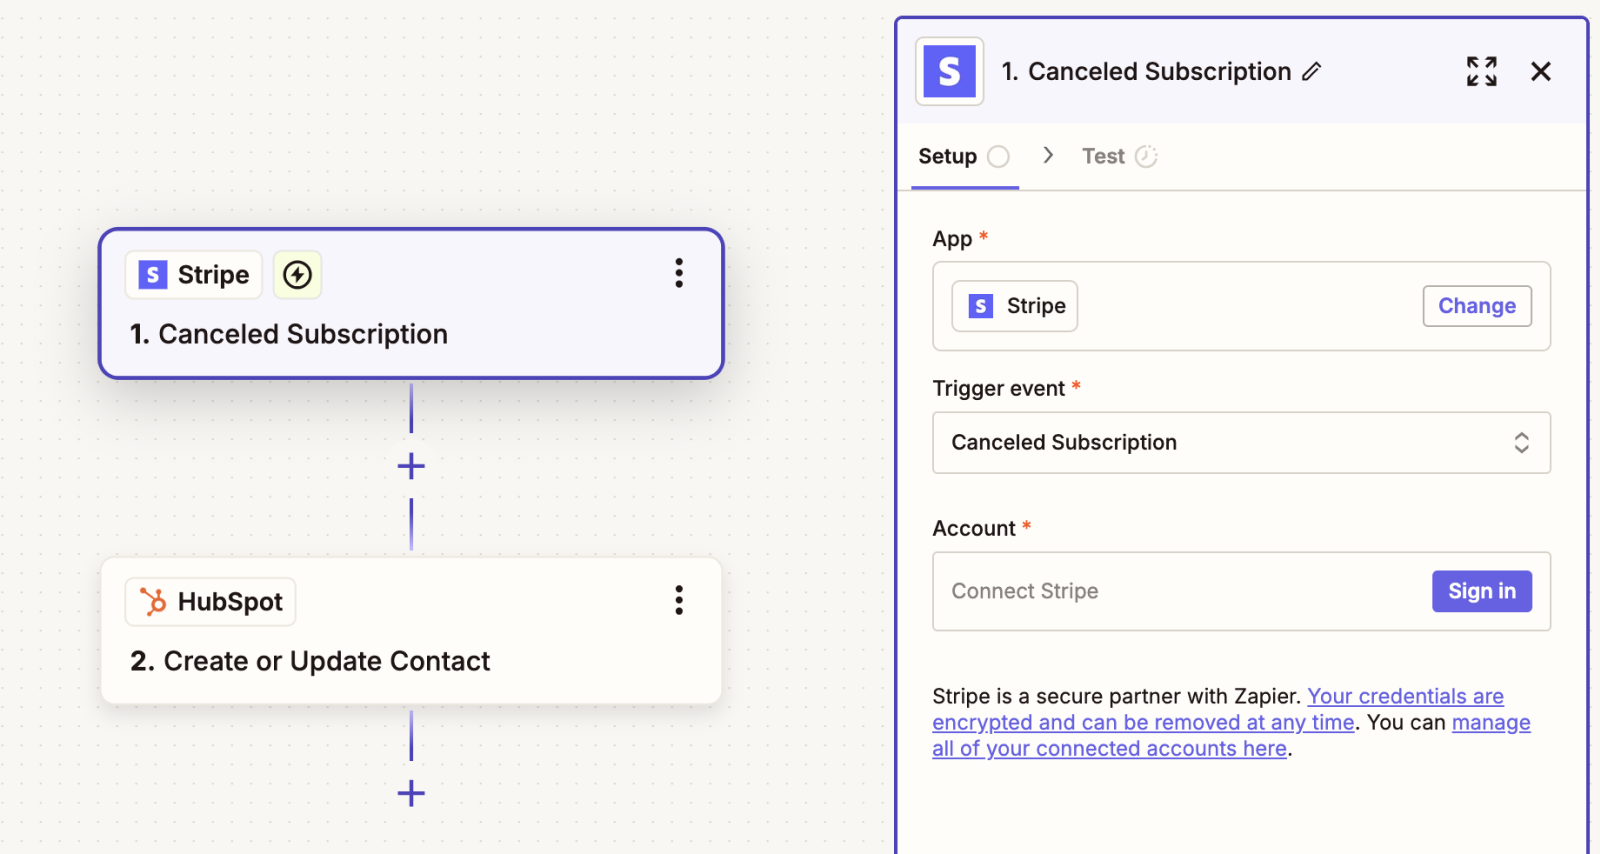
The first step of this method involves creating an automation in Zapier to send contacts from Stripe to HubSpot. You can start with this template. Click Try this template to copy the template to your Zapier account.
Connect Stripe
Click the first step (1. Canceled Subscription) to open the step configuration. Under Account, click Sign in.
In the popup, optionally supply a test mode key and click Yes, Continue to Stripe. Choose your Stripe account and click Connect. You’ll be redirected back to Zapier.
In the step box, click Continue.
On the next tab, follow the instructions to test the connection. You’ll pull a sample record for use when mapping fields to HubSpot in the next step.
Connect HubSpot
Click the second setup to open the HubSpot configuration. Sign in to HubSpot and review the list of permissions requested by Zapier. Click Connect app to grant access. You’ll return to the Zapier configuration page.
In the HubSpot card in Zapier, click Continue to configure the step. This involves mapping fields from Stripe to HubSpot.
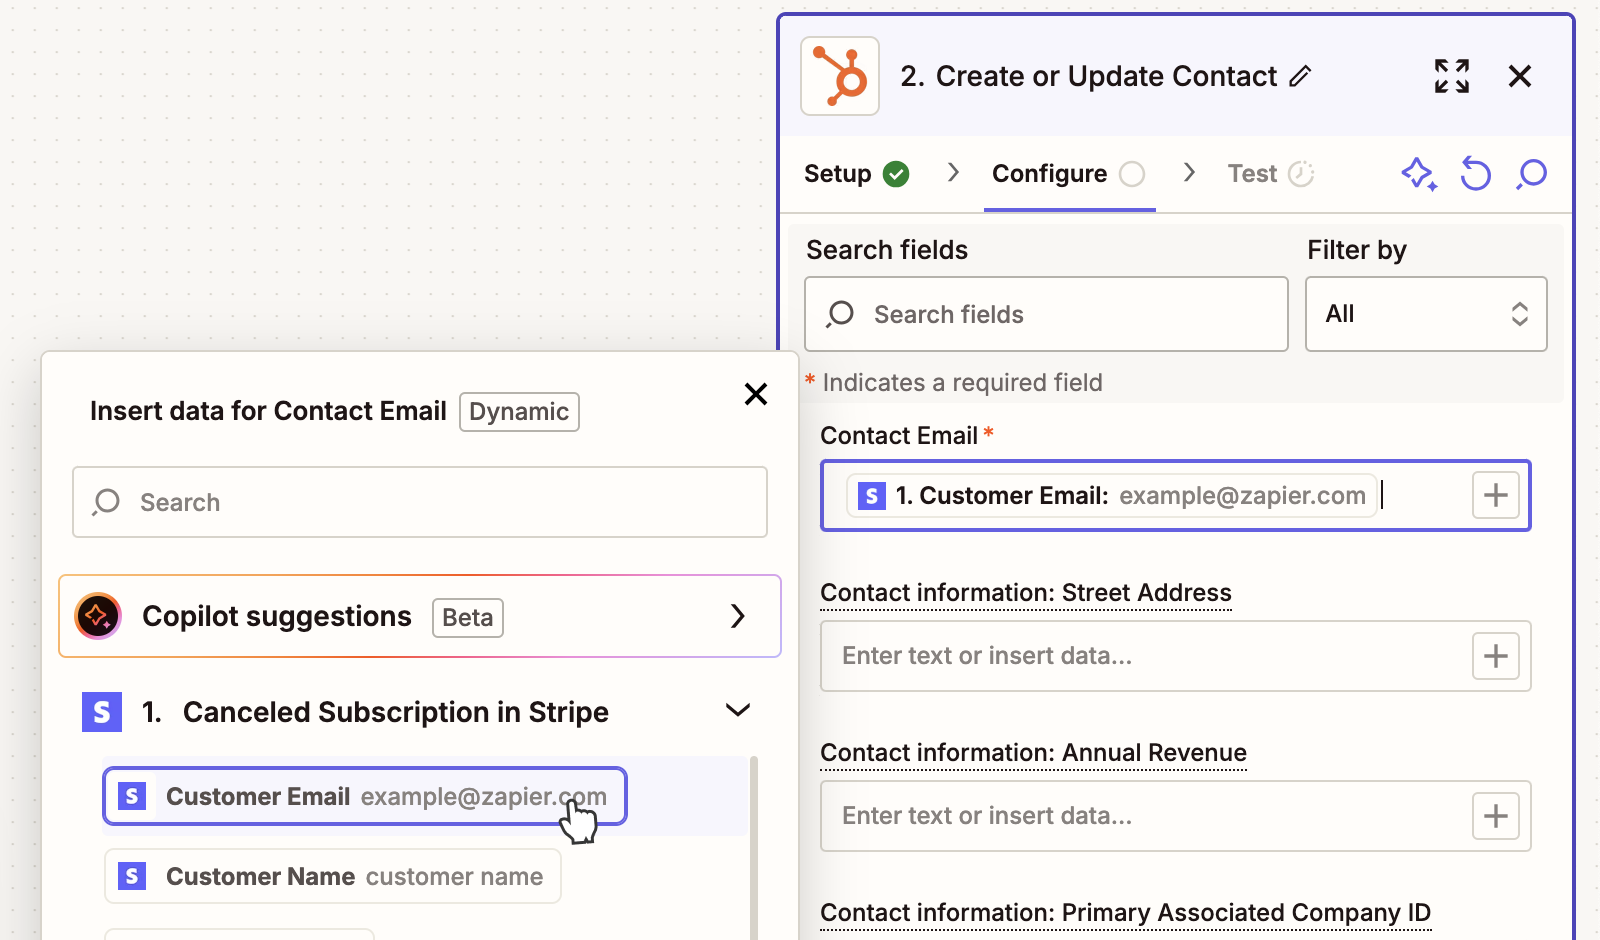
At the very least you’ll need to map Stripe Customer Email to HubSpot Contact Email and Stripe Customer Name to HubSpot Contact First Name.
For additional segmentation options in your winback campaigns, you may also want to include Plan Nickname, Plan Amount, Start Date, Canceled At and Cancelation Details Reason. To do so, you’ll need to create custom contact properties in HubSpot.
Once you’ve specified all your field mappings, click Continue. Review the data and then click Test Step (or skip).
The Zap is now configured to create (or update) contacts in HubSpot whenever a Stripe subscription is canceled. Next you’ll create your winback email in HubSpot.
2. Create a customer winback email template
Go to your HubSpot dashboard and click Marketing in the left sidebar, then Email.
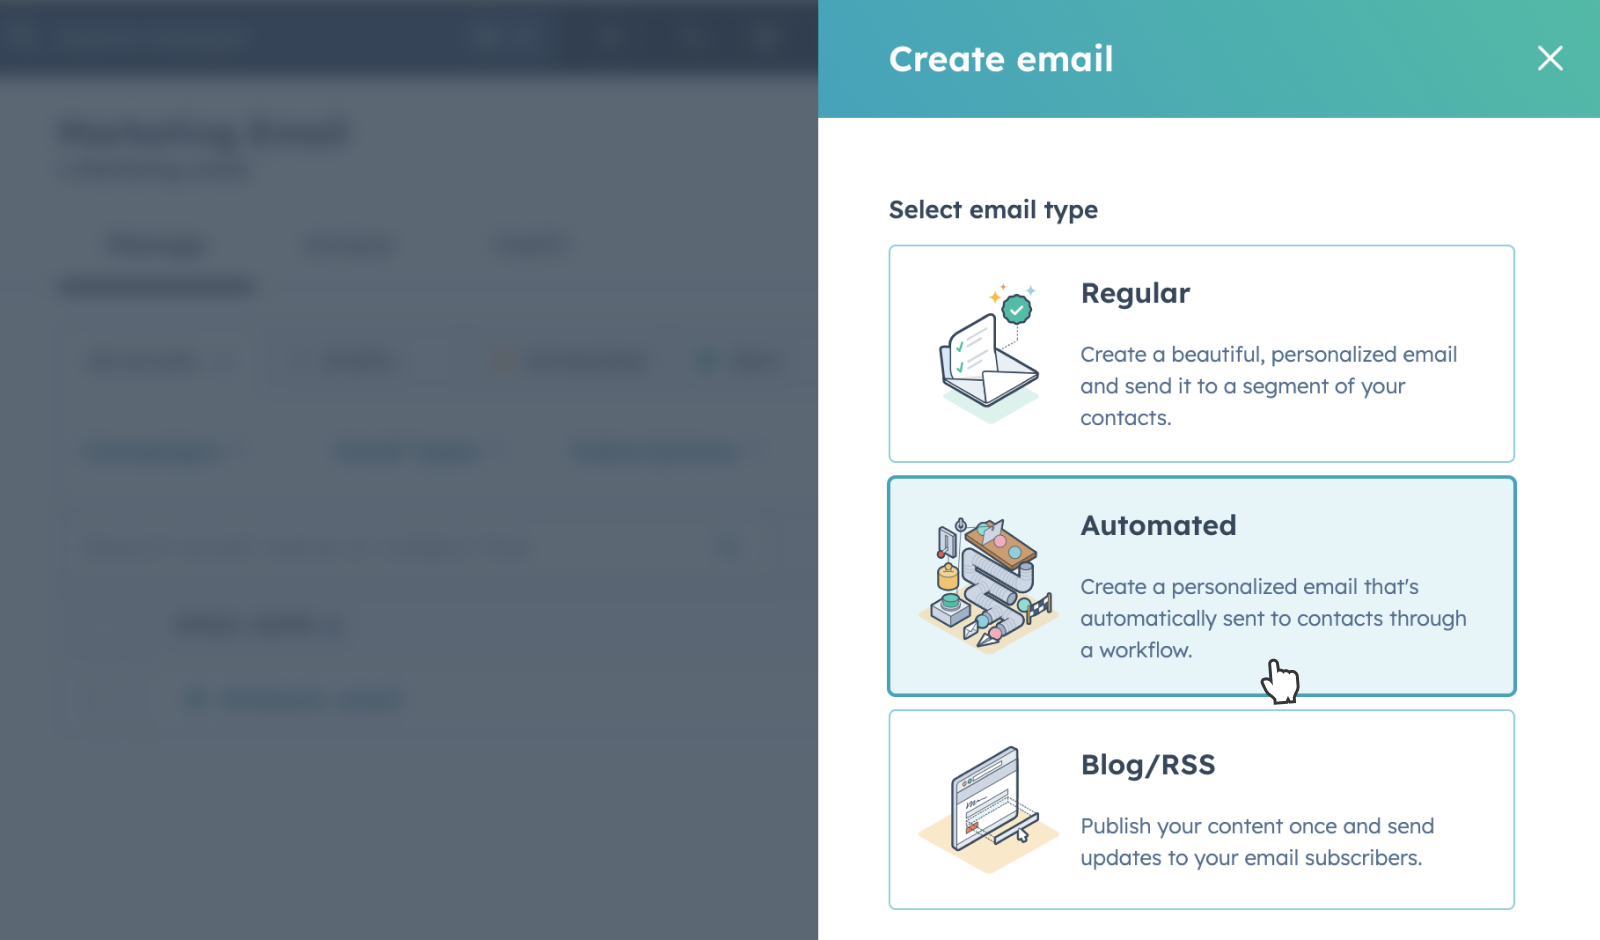
Click Create email on the right, choose Automated and click Next.
Choose a template or Start from scratch.
Give the email a name, e.g. Winback email.
Design your email (learn about automated emails in HubSpot), and when you’re ready click Review and Publish. If everything looks good, click Publish.
Next, we’ll create a workflow to automatically send the email.
3. Build a workflow automation to send your winback email
In order to automatically send your winback email to canceled Stripe customers, you’ll need to create a workflow automation.
In HubSpot, in the left sidebar under Automations, choose Workflows.
Click Create workflow on the right and select From scratch.
Select Contact-based and then click Next.
At the top, give the workflow a name, such as “Winback workflow.”
Leave the trigger as Manual enrollment only. In the next step we’ll set up Zapier to enroll contacts in the workflow when they cancel in Stripe.
Click the + to add a step. Choose Delay and For a set amount of time. Select a reasonable delay—the timing of your first winback message depends on the nature of your campaign. Click Save.
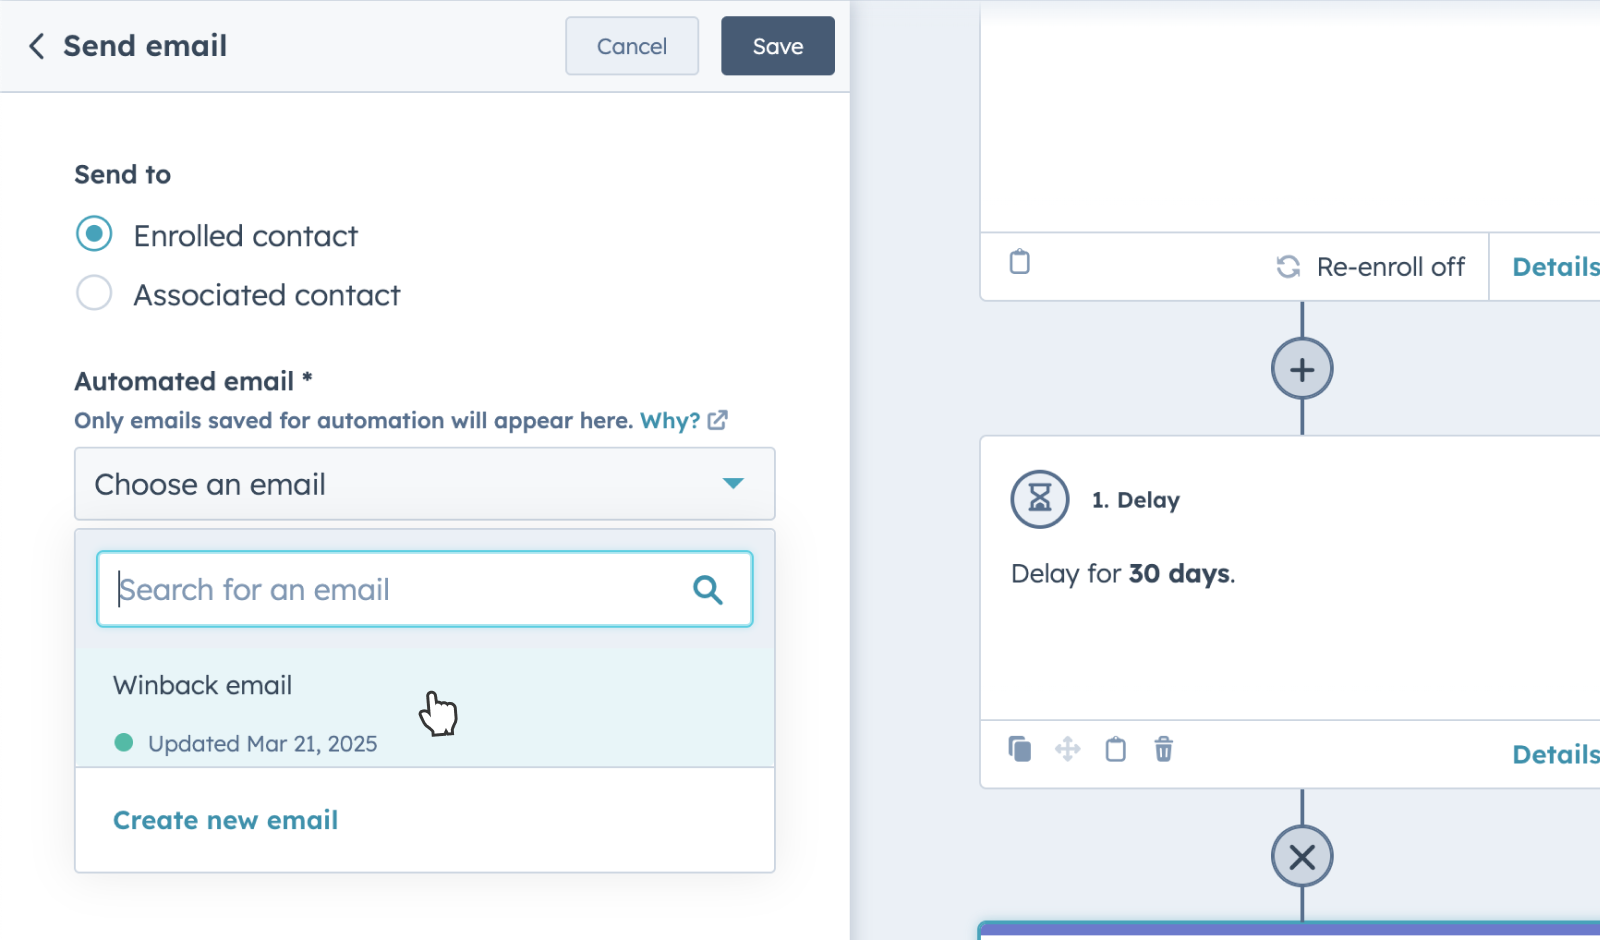
Click the + below the delay to add another step. Click Communications and select Send an email. Leave it on Enrolled contact. In the Automated email menu, select the email you created in the previous step (e.g. “Winback email”). Click Save. You now have a basic winback campaign configured. Let’s return to Zapier for the final step.
4. Update the Zap to enroll contacts in the HubSpot workflow
We’ll use Zapier to automatically enroll contacts into your HubSpot winback campaign workflow. First return to the “Zap” you created in the first step.
Click + to add a third step and choose HubSpot. Click the Action event box, choose Add Contact to Workflow and then click Continue.
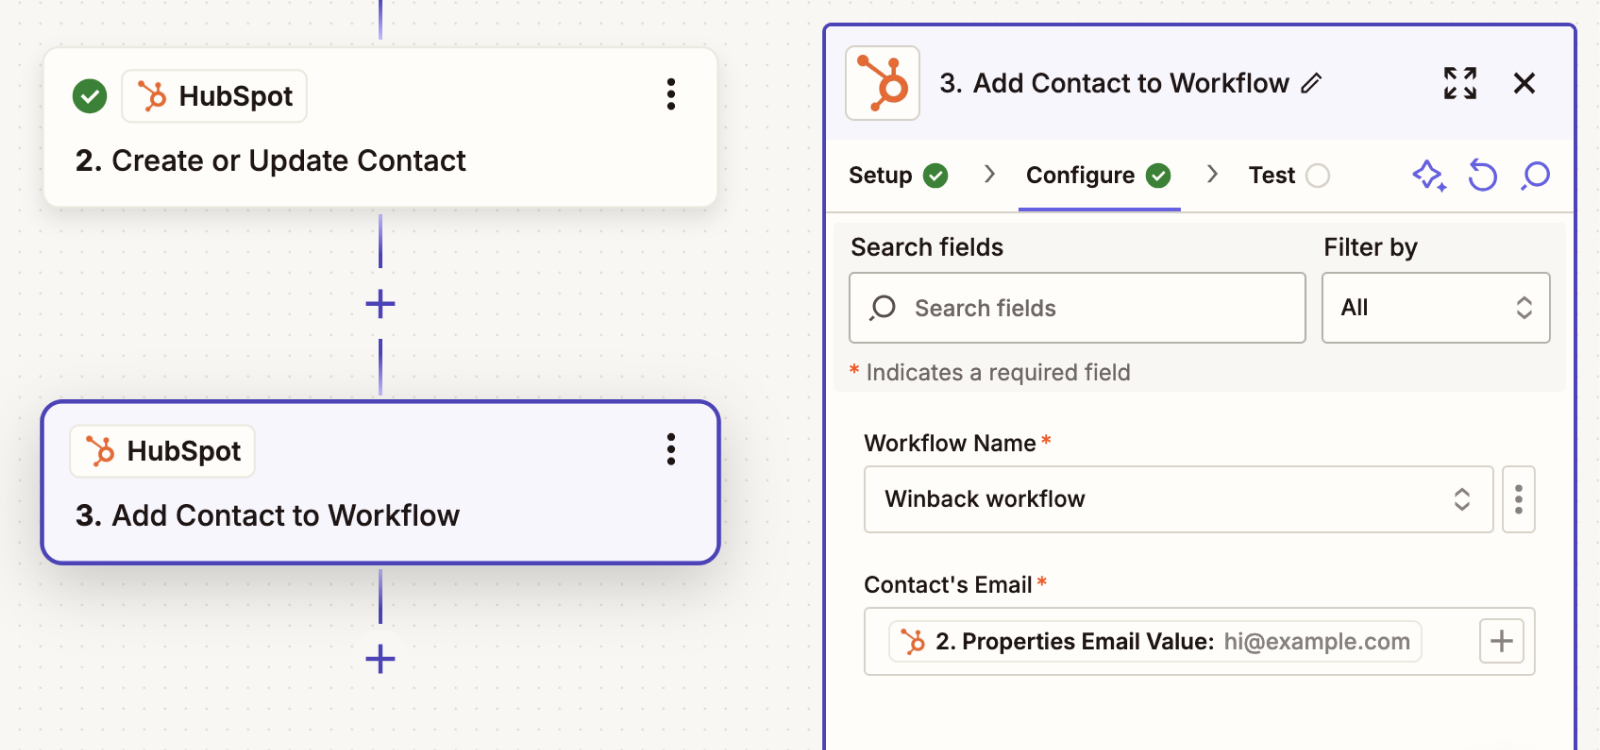
Under Workflow Name choose “Winback workflow” and for Contact’s Email select Properties Email Value. Click Continue. You can test or skip the step.
When everything is ready, click Publish. Caution: this will start emailing all new canceled subscriptions. Make sure everything is just right before publishing.
Limitations
Automating your winback campaigns with Zapier and HubSpot is certainly a step up from the manual import/export method, but it has some drawbacks:
Set up is complex
Most marketing platforms like HubSpot are geared toward ecommerce, not subscription-based businesses
ProsperStack Reactivate
ProsperStack Reactivate is the customer winback automation platform designed specifically for subscription businesses.
Reactivate works seamlessly with Stripe, no complicated configuration required. Simply connect Stripe and start building your winback campaigns.
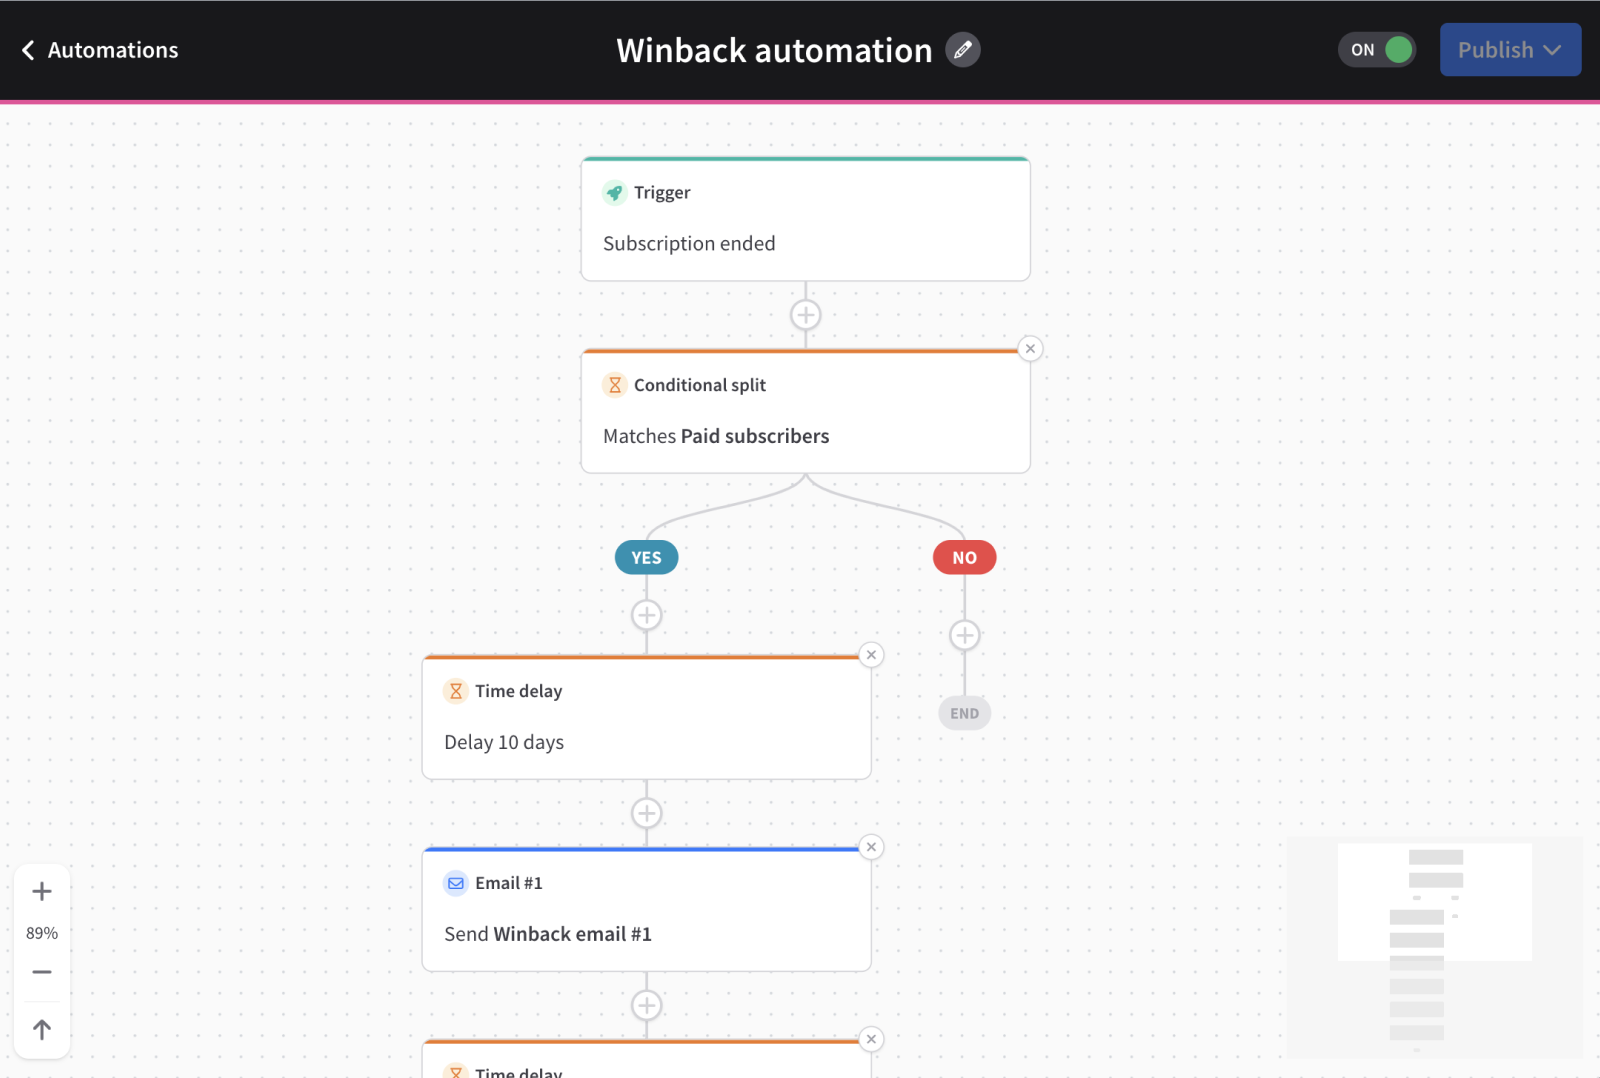
Key features:
Set up triggers, offers, emails and intelligent branching with ease
Design winback incentives and apply coupons in Stripe automatically
Easily segment customers based on demographics, MRR, LTV and more for targeted incentives and personalized messaging
Let’s take a look at how you set up a winback campaign in Reactivate.
Connect Stripe and configure your email provider
For Retain customers, you’ve already connected Stripe. For new customers, connecting Stripe is easy.
For Reactivate, you’ll also need to configure your email service provider (ESP). Click Settings in the left nav and then click the Automations tab.
Under Email service provider, click Configure.
Fill in the settings for your ESP and click Save.
Create a winback offer (optional)
Most winback campaigns include some kind of incentive to entice customers to return. With ProsperStack Reactivate you can easily design winback offers that work automatically with Stripe. If you’re not going to include an offer, skip this step.
To create an offer, click Offers in the sidebar beneath Reactivate, then click Create offer on the right to open the offer panel.
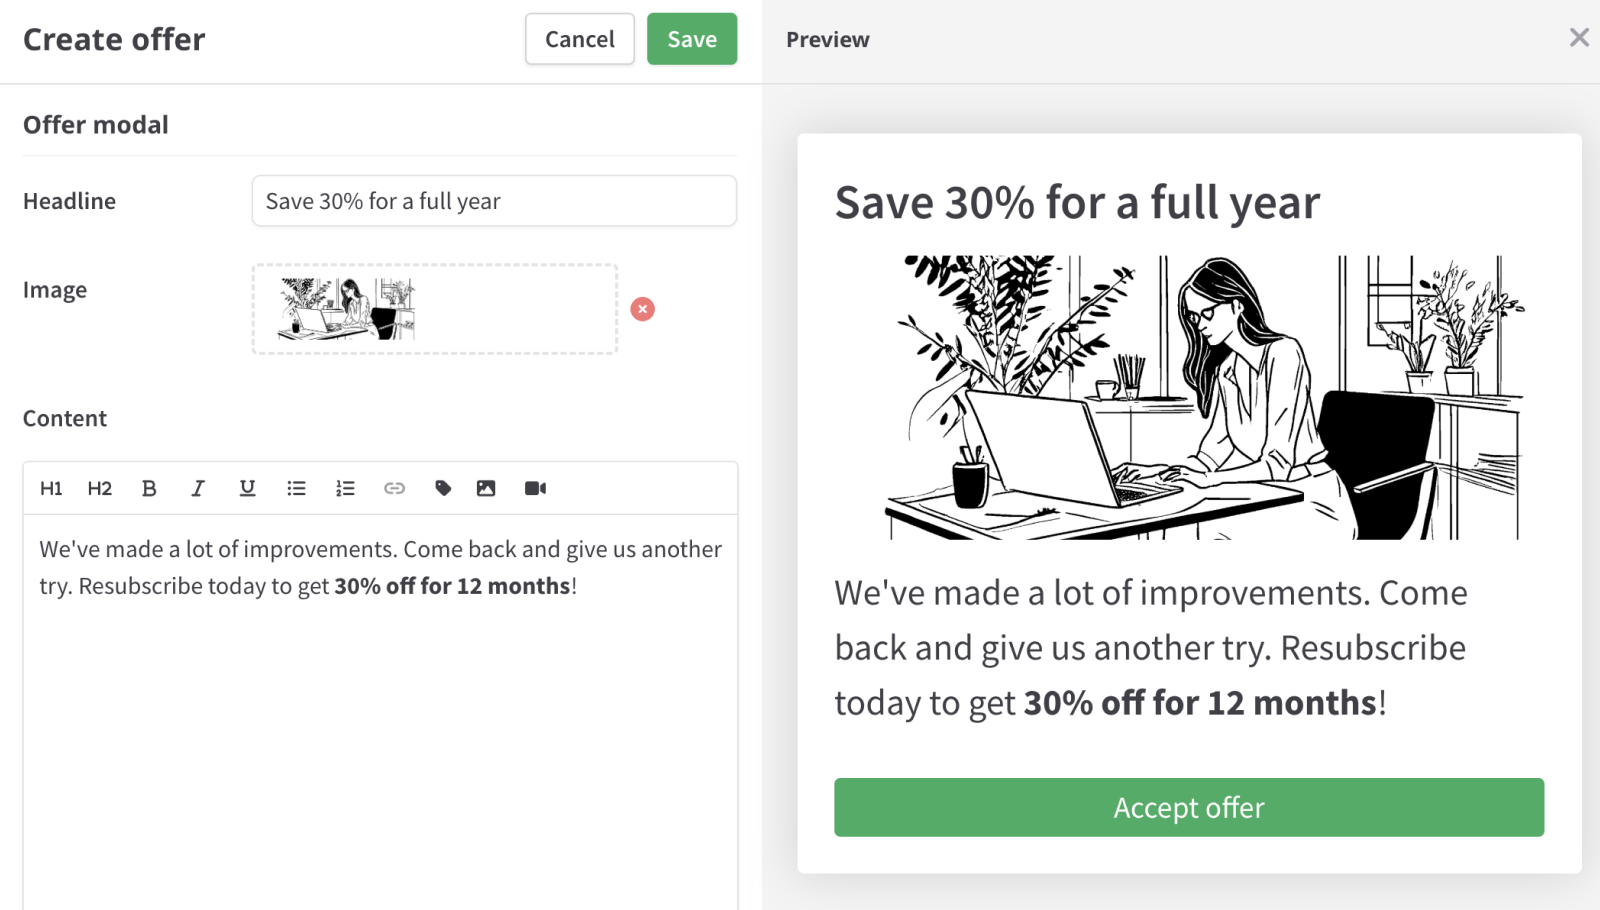
Give the offer a name and then choose whether to use an existing coupon in Stripe or create a new one. When creating a new coupon, you can choose whether to offer a percentage or fixed discount and how long the offer applies (e.g. 3 months).
Enter headline and content, including images, video and links, and click Save.
Now that you’ve created an offer, it’s time to design your email sequence.
Build your first winback automation
To create an automation, click Automations in the sidebar under Reactivate, then click Create automation on the right.
Name the automation and click Create.
Choose what event should trigger the automation. For a winback campaign, you’ll typically want to use Subscription ended. Save your choice.
Now you’re on the automation canvas, where you can configure the sequence of steps each subscriber goes through once the trigger event has occurred.
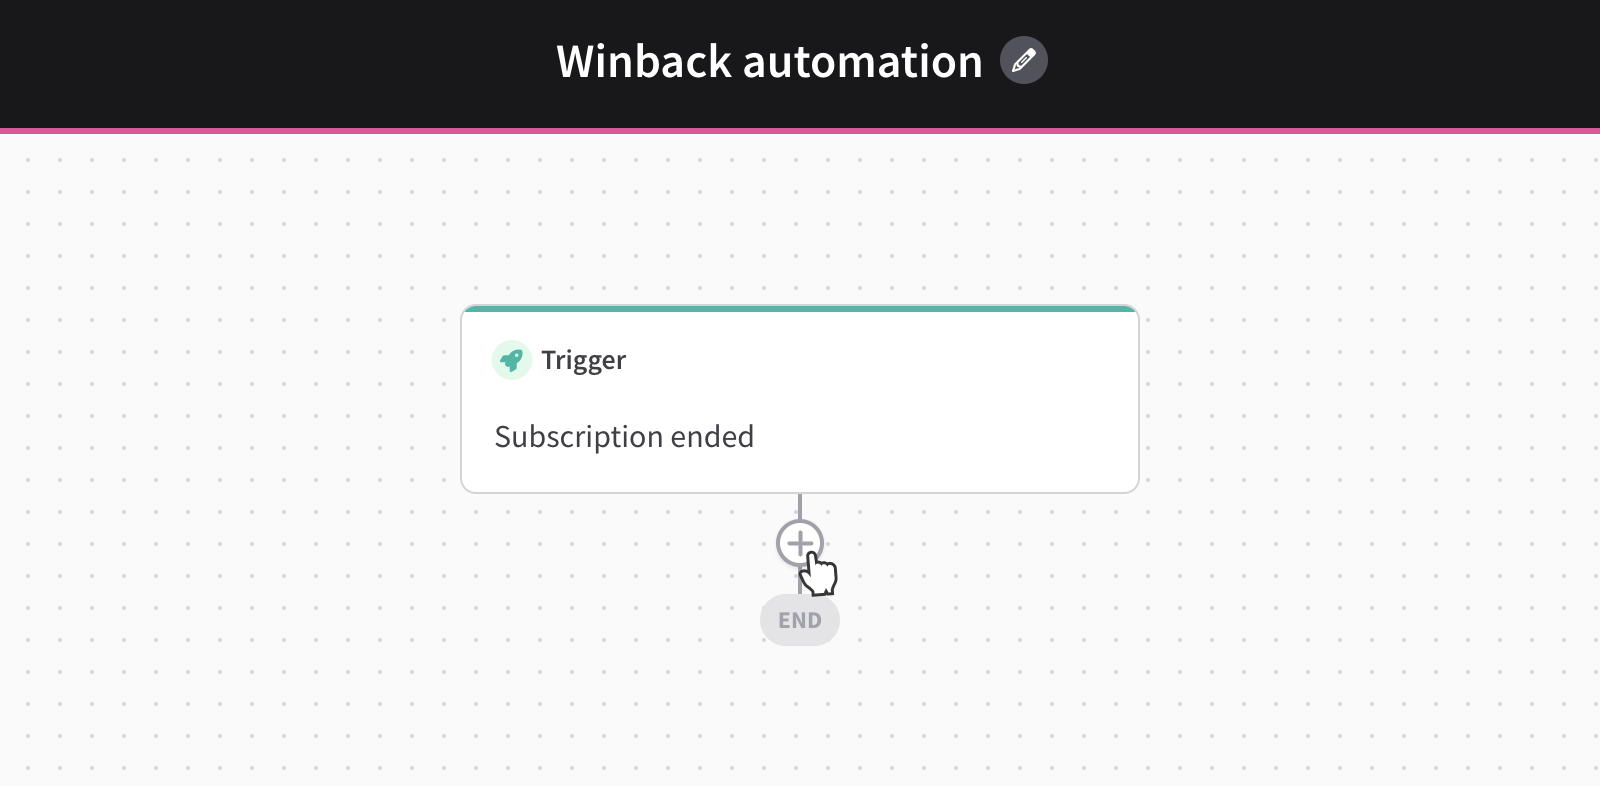
Typically you’ll want to delay sending a winback email. To insert a delay, click the + to add a step and select Delay. Choose a timeframe and click Add step.
Next let’s add an email. Click the + to add the next step and select Email.
Enter a step name, subject line and sender details. Beneath the Email library, click Create email to design a new email in a powerful drag-and-drop editor.
Give the email a name.
To get started, drag a Text block onto the email canvas.
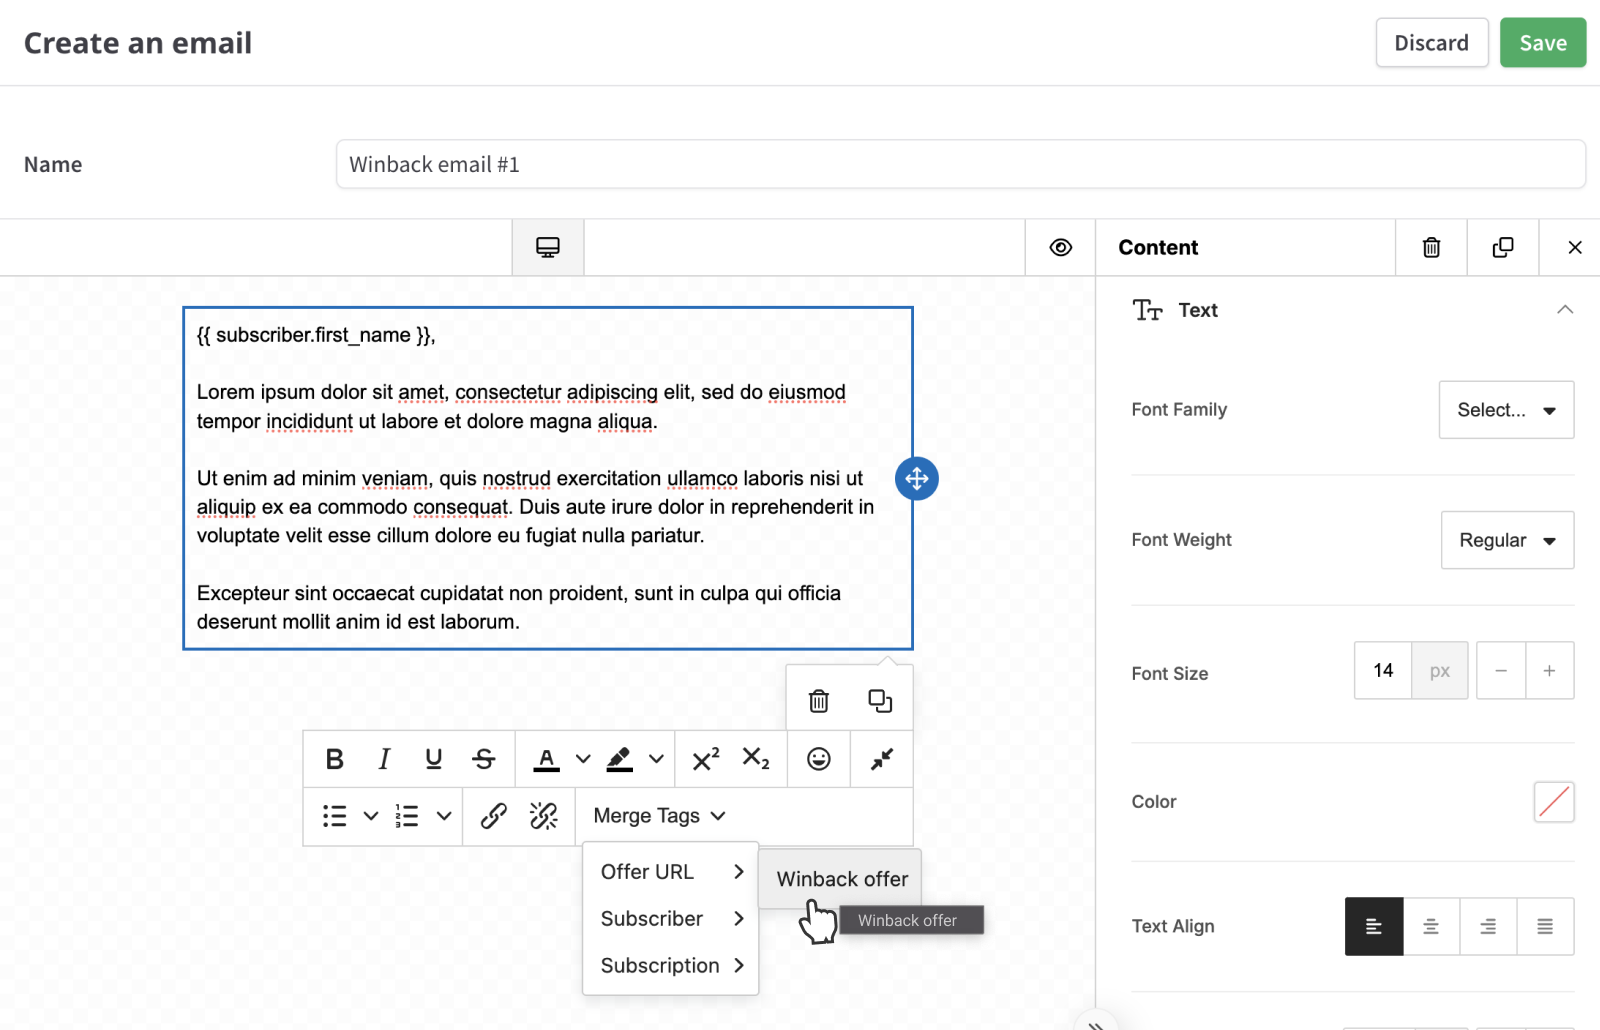
Personalization is simple. For example, to insert the subscriber’s first name, click Merge Tags, hover over Subscriber and click First name. If you created a winback offer in the previous step, you can link directly to it via the same Merge Tags menu.
When you’ve finished drafting the email, click Save.
Click Save again to save the step.
You can continue to add additional steps to your winback campaign. When everything is ready, click Publish. That’s it, your winback campaign is live.
Conclusion
Reactivating canceled subscriptions is a powerful way to boost revenue and customer retention for subscription-based businesses using Stripe.
Manually exporting cancellation data is an easy way to get started, but for long-term, scalable winback efforts, automation is key. Connecting Stripe to an EMP with Zapier can streamline the process, though it requires technical setup and isn’t specifically tailored to subscription models.
For businesses seeking a seamless and specialized solution, ProsperStack Reactivate’s dedicated winback automation integrates directly with Stripe and provides features tailored to subscription businesses. Get a demo to learn more.

